
The chassis is turning out to be a lot of work. I haven't blogged after a week or two, so I've made a lot of progress. I'll split this into two posts.
I finished all my wood cuts and most drill holes. So I was ready to assemble the box. I glued and screwed it together, let it dry, and sanded/finished it. I'll show more pictures later of the finished wood. It came out quite nice, despite my less than perfect corner cuts. A little wood putty in the cracks helped smooth things over. It's not perfectly square in all dimensions, but close enough.
The aluminum is a bit of a hassle. Lots of holes to drill, needing to be perfectly aligned, and if my drill bit wasn't exactly the right size, I often had to widen things out with a file. Cutting out the hole for the power connector was pretty unpleasant--drilled holes, then inserted a hacksaw to cut out the shape, then filed. As with many of the steps on this project, I did some things once, then realized a mistake and did it again. For example, I drilled holes exactly the diameter of the speaker connectors, then realized they should be bigger for the plastic mounts so the shaft doesn't actually touch the metal and short circuit.
 |
| A flush mount screw hole |
I wanted the screws that held the top aluminum panel to the wood frame to be flush with the top--nice and clean. I didn't have a countersink bit, so I just used a larger drill bit and carefully drilled part way down. It's not perfect, but not bad. The other screws for the transformers, etc. will still be rounded top screws mounted on top. Who do you think I am? Some sort of metal working master?
 |
| The hole for the power connector |
At first, I thought I would sand and polish the metal to a mirror finish, but I don't have the sandpaper and buffing tools for this, plus I ran out of patience. So I thought a scratched aluminum texture could still look good. Sanded with 220 and then 400 all moving in the same direction. The aluminum is so soft that it scratches easily. Maybe there's a protective coating I could put on, but I'm not going to be a perfectionist on getting it to be flawless.
 |
| The back panel with holes (that I later had to drill bigger) |
For the bottom, I used the back of an old picture frame--you know, that sort of thick cardboard woodish sort of material. I won't really finish this until the very last step, and will probably drill more holes for air flow.
 |
| Bottom panel. |
 |
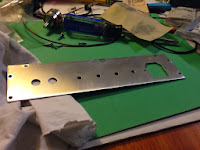
| My workbench has become a mess. I cleaned it up after this. |
 The chassis is turning out to be a lot of work. I haven't blogged after a week or two, so I've made a lot of progress. I'll split this into two posts.


No comments:
Post a Comment