Sunday, February 9, 2014

Waiting


I have most of the amp put together, at least roughly. At this point I'm just waiting on my output transformers to arrive. I bought them from Edcor, a company in New Mexico that makes them to order so it can take 5-6 weeks.
 
Here's a picture with the tubes in place temporarily. I bought all JJ Electronics tubes because they were relatively inexpensive. For tube-people who want to know, the amp uses:  GZ34S rectifier, ECC81 preamp, and EL34 output tubes (matched pair). JJ was a subsidiary of TESLA, a company with a long history in former Czechoslovakia, named after the famous engineer and physicist Nikola Tesla. When I started this project I thought it might be neat to get all parts made in the USA or something like that, but it seemed hard to find tubes made in USA now unless they are vintage. So I have an Allied (Hammond) power transformer made in Canada, Edcor output transformers from New Mexico, tubes from Slovak Republic, PCB from an engineer in Florida, miscellaneous passive components from who-knows-where, and the run capacitor I think was assembled in Mexico.
 
I got only a medium sized run capacitor--apparently this is an inexpensive way to get a film capacitor which works well on an amplifier. It's oil-filled I guess for cooling. These are normally found in automotive or HVAC applications, so they are easy to find. I could have bought a 100uF capacitor but it would be bigger and in my opinion, ugly sticking up so high, so I got one that is 45uF. I'm not trying to build an ultimate stereophile amplifier, just one that sounds pretty good. I also didn't like the look of a run capacitor mounting bracket so I superglued it to the top panel. Wouldn't survive a big bump or hit, but neither would the tubes, right?
 
At this point, I'm still thinking the design of the amplifier is a bit plain--it's a wood box with aluminum panels, a switch and a knob. It needs some sort of character or artwork. Part of me wants to make up a logo to put on it--is that a function of my expectations that all good products are branded with a commercial name? I'll keep thinking on this and maybe come up with something to add a unique element. The output transformers will be painted blue (Edcor design) which I'm wondering if it will look either good or strange. We'll see...

Saturday, February 8, 2014

Assembly


Ok, things are coming along just grand. Lots more work to finish up the chassis so I could actually start getting this thing put together. I finished the wood with stain and two coats of semigloss polyeurethane. I finished drilling all of the holes and sanding the aluminum, and have mounted the power supply, PCB board, and done quite a bit of wiring inside.

I bought a power choke and supplemental capacitor (motor run) not shown here. These are optional, but I've put so much into this thing that another $8-10 for each of those was worth it, assuming they do the stuff they are purported to do. Once again, I'm not much of an electrical engineer so I don't really understand it. I think the choke filters the AC power to take the alternating pattern out of the signal somehow and leave only the DC signal. I don't know, something like that. And the capacitor just adds extra ability to provide power needed for peak demands of amplification.

You'll notice a blue knob in the picture above that I thought was a bit too heathkitish, and later I bought a different black knob. I still don't like that one either, it's so boring. I can't seem to find a knob that looks right.
The power choke
back panel with connectors mounted
My soldering skills faltered a bit on the potentiometer (volume control) when I first wired it backward and didn't have enough length of my wires to make it work. So I have some giant globs of solder holding it together. I used some old RCA cables for my audio signal wiring, and sliced open an old PC power cable to reuse the wire from it for the power switch and ground wiring.

You will also see my blog skills are weak as I can't seem to get these pictures to flow right on the page. Whatever, right? You want to see what I'm working on, deal with it.
Coming together inside


More Chassis Work


The chassis is turning out to be a lot of work. I haven't blogged after a week or two, so I've made a lot of progress. I'll split this into two posts.

I finished all my wood cuts and most drill holes. So I was ready to assemble the box. I glued and screwed it together, let it dry, and sanded/finished it. I'll show more pictures later of the finished wood. It came out quite nice, despite my less than perfect corner cuts. A little wood putty in the cracks helped smooth things over. It's not perfectly square in all dimensions, but close enough.
The aluminum is a bit of a hassle. Lots of holes to drill, needing to be perfectly aligned, and if my drill bit wasn't exactly the right size, I often had to widen things out with a file. Cutting out the hole for the power connector was pretty unpleasant--drilled holes, then inserted a hacksaw to cut out the shape, then filed. As with many of the steps on this project, I did some things once, then realized a mistake and did it again. For example, I drilled holes exactly the diameter of the speaker connectors, then realized they should be bigger for the plastic mounts so the shaft doesn't actually touch the metal and short circuit.
A flush mount screw hole


I wanted the screws that held the top aluminum panel to the wood frame to be flush with the top--nice and clean. I didn't have a countersink bit, so I just used a larger drill bit and carefully drilled part way down. It's not perfect, but not bad. The other screws for the transformers, etc. will still be rounded top screws mounted on top. Who do you think I am? Some sort of metal working master?

The hole for the power connector


At first, I thought I would sand and polish the metal to a mirror finish, but I don't have the sandpaper and buffing tools for this, plus I ran out of patience. So I thought a scratched aluminum texture could still look good. Sanded with 220 and then 400 all moving in the same direction. The aluminum is so soft that it scratches easily. Maybe there's a protective coating I could put on, but I'm not going to be a perfectionist on getting it to be flawless.
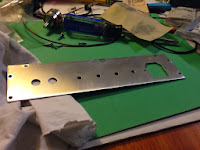
The back panel with holes (that I later had to drill bigger)
For the bottom, I used the back of an old picture frame--you know, that sort of thick cardboard woodish sort of material. I won't really finish this until the very last step, and will probably drill more holes for air flow.
Bottom panel.
My workbench has become a mess. I cleaned it up after this.